

So who’s taking our Sewing Challenge this month? Whether it’s learning to sew, or tackling a sewing project that’s intimidating to you, be sure to have fun with it! And let us know how we can help! We’d love to encourage you!
So all month we hope to have some posts on sewing basics. Yes, it’s already a week into September and we’ve yet to share one, but due to Labor Day Weekend, we figured it was best to start once everyone was back from that busyness, us included!
For this first post, we’d like to share some Basic Tools that you’ll need to have on hand before you start sewing! Some of these might be obvious, but we’ll share why each is so important! Your sewing machine might also come with a few of these items, so that will be nice to take off your list! I remember going through the sewing section of Walmart with my mother-in-law asking what were the basic supplies I needed to start sewing. Most of these I purchased for the first time then. And the great thing about these is that most are pretty inexpensive, so you’ll only be spending a couple dollars here and there.

I keep a little basket next to my machine with most of these tools (well, all the ones that will fit in it). Then it makes it so easy to grab what I need, since these are the items that I use everytime I sew!
- Seam ripper!- this is one well used tool in my little basket! I actually have two- one for each machine I’ve owned because they came with them- and I use them both! And don't feel bad if you have to rip seams and start over- we all have to, even experienced sewers! I just had to rip stitches sewing an order that I sew all the time, but I just didn’t get the stitch straight that time. There's no chame in it- it's part of the learning process, even if it is frustrating. So rip that seam and keep going… :)
- Machine Manual- Even though an instruction manual seems boring or overwhelming, your sewing machine manual will be a great help in learning all the different parts of your machine, before you even place fabric under needle, and foot to pedal. Sit in front of the machine and read through the maual. I would read each page until I understood what it was saying and could see/do for myself what it said! Keep your manual handy for awhile until you get the hang of threading your machine and winding a bobbin. I still pull mine out regularly to troubleshoot, look up info on needle size to fabric types, learn different stitches, etc.
- Scissors- When I began to seriously sew, I knew I needed better scissors than the dollar store pair I’d had in college! I purchased a nice set of fabric scissors at JoAnn Fabrics, as well as a small pair of sharp scissors for clipping threads at the end of a stitch. These are needed for precision, cutting as close as possible with the tiny, dianty points that large fabric scissors just can’t manage. It's important to have a pair specifically designated for cutting fabric, only so they stay nice and sharp! Scissors can be expensive, but JoAnn’s has a great selection, and several times during the year has a 50% off sale on all their scissors, so watch for it or take a coupon!
- Pins- These will be needed for pretty much any fabric project you can think of! They’re used to keep fabrics together and in place until they’re sewn together. I started out with some small pins that are all ready to be thrown away because they’re so bent up, aka “well used”! My husband put some beautiful pearl head pins in my stocking last Christmas that I use exclusively now! They are longer and stronger than my other ones!


- Fabric marker- this is a great tool for marking fabric before you cut it or sew it, whether you’re measuring it yourself or tracing a pattern piece. There are some great markers that use disappearing ink and washable ink (dab it with a damp cloth).
- Pattern weights-This is an item that is not really a necessity as I went a long while before I owned any pattern weights, but once you have them, you’ll consider it one! I not only use my pattern weights to hold pattern pieces in places on fabric while I trace or cut, but I use it to hold fabric in place, that wants to slip off my cutting mat. These come in so handy on a regular basis. I first got a set of my own pattern weights for Christmas from Laura who made them herself and posted this tutorial for making your own. Believe me, making them will be cheaper than buying them- plus they’ll be cuter! {Pattern Weight Tutorial} (<--- they're no-sew, btw! ;) )
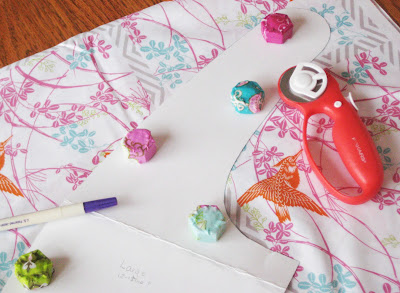
- Rotary cutter/cutting mat- Scissors are okay for a while, but if you start regularly cutting fabric, especially straight lines or large pieces, you’ll want to get a cutting mat and rotary cutter. I was fortunate that I already had both of these items in my scrapbooking supplies, and then eventually bought a larger cutting mat to accomodate my sewing need. Cutting fabric can actually be the most time consuming part of sewing a project, and having these tools will help this step to be more precise and save you time.
- Tape measure- Measuring is something you do a lot in sewing. And while a ruler or yardstick are great, a flexible tape to measure where to mark or cut a fabric, for instance, just can’t be beat! While I now have many forms of measurement, the 60” tape measure I purchased on that first sewing excursion to Walmart is what I still use the most!
- Iron- Hopefully this will be an item you already own as a daily household appliance. But believe it or not, an iron is almost as important in sewing as your machine! Pressing folds in fabrics or seams down, ironing at different stages of your project is vital! Plus many sewing aids are fusible (iron-on)- interfacings, stablizers, adhesives, etc. All in all, it keeps your project looking crisp with clean lines the whole process from start to finish. Ironing does some of the job that a pin would do in keeping fabrics together and edges matched up! Precision seems to be the word I keep repeating, and this tool is no different in helping you achieve that. A good iron will be able to adjust heat to different types of fabric and has an option for turning steam on/off. Here are the irons that we use:


- bobbins & thread: You probably received some bobbins with your machine and if so, you might not feel the need to purchase any more right away. A bobbin is wound with thread from the spool you buy (bobbin winding is explained in your sewing machine manual), and is placed inside your machine. This is the thread that is sewn into the underside of a piece of fabric as the needle thread brings it up. For general sewing projects, an all-purpose thread (100% polyester) is all you need.

- Needles (hand & machine)- Extra machine needles will probably come with your sewing machine, but you'll definately want to be sure you at least have some around in case your current one breaks or becomes dull. Many sewing problems can stem from a needle that needs to be changed. Check your manual to learn how to change the needle and about the different types and sizes of machine needles. Hand needles are important to have around in case a project calls for some hand sewing, or if you need to sew on a button. You never know when you may need them!
- Lamp- A lamp next to your machine is important because it helps you to see the details of what you're doing and provides some direct light. There are many sewing lamps on the market, many very expensive. I use an old desk lamp of my husband's from college, that I've positioned right behind my machine next to my little tools basket. I love that I can move the head of the lamp around to shine right where I need it!

Are there any I'm forgetting to mention? Probably! If you think of one, let us know! But hopefully this will help you get started, know what to look for and why it's important!
Stay tuned for "How to sew a straight stitch" coming later this week!
//Click here if you missed our Sewing Challenge and National Sewing Month post!//
//Click here if you missed our Sewing Challenge and National Sewing Month post!//
{Have you seen our Fall Collection yet?}
0 comments:
Post a Comment