
I have thinking of a few fun tutorials that I can share with you. I am a frequent browser of crafty blogs, and I so appreciate their amazing tutorials. I would love to give back, and help others dig into their crafty side as well. And I am so excited to share my very first tutorial with you. If you own a glue gun you can do this! What I'm about to show you isn't something new. You can find a few of these tutorials out in internet land. But I thought I'd share with you how I make mine. These headbands are fantastic for babes without much hair. I'm so thankful some smart person out there thought these up, because I don't know what I would do if I had to wait until Elissa had enough hair to be able to put hairbows on her. These headbands are my best friend!
I thought I'd start off, by showing you a quick photo of my current workspace.

Ugh. I know, not very pretty. I've been sentenced to our unfinished basement. But there's lots of space for all that ribbon. So this is the Hairbow making station! I'm daydreaming of some beautiful and inspiring workspace in the future. But that will have to wait until our basement can be finished, and we have something besides brick walls! But this will give you some explanation as to why the photos are so horrible. Basement lighting = awful lighting for photos. Sorry.
Anyways, on with the tutorial! This is what you'll need to get started.

*A headband (I found a package of 2 for $1 at Joann Fabrics by their checkout in their little dollar spot. But you can find all kinds of fabric headbands at Meijer or Walmart)
*Ribbon (either contrasting, or matching works best)
*Scissors
*Hot glue gun (my very best friend)
*A heat sealer (ie. candle, lighter, or a wood burner)

The first step, cut a piece of ribbon 2" long (you can use whatever width ribbon you like, but either 3/8 or 5/8 works the best.

Once your ribbon is cut, you need to heat seal the ends so they don't fray. Since I work with ribbon a lot, I use a wood burner. It's fast, easy and gives the ribbon a really good seal. But a lighter or candle will do the trick too. Just hold the end of the ribbon in the end of the flame just long enough for it to slightly melt. Don't hold it there too long, or it will blacken. Do this to both ends of your ribbon.

Now, open up the headband to the back side. I like to place my ribbon right over the seam of the headband, so once I've created my interchangeable loop, you can't see the seam anymore. Place a small dab of glue onto the end of the ribbon and place it on to the headband.

Once that's dry, turn the headband over, and pull the ribbon of to the front. Squish up the headband to create a few creases. You are NOT going to place any glue on this side. You want to be able to slide your alligator hairbow through this part once you're done.

Now turn your headband back to the back side, while keeping it squashed up, place another dab of glue on the end of the ribbon that's already been glued on.
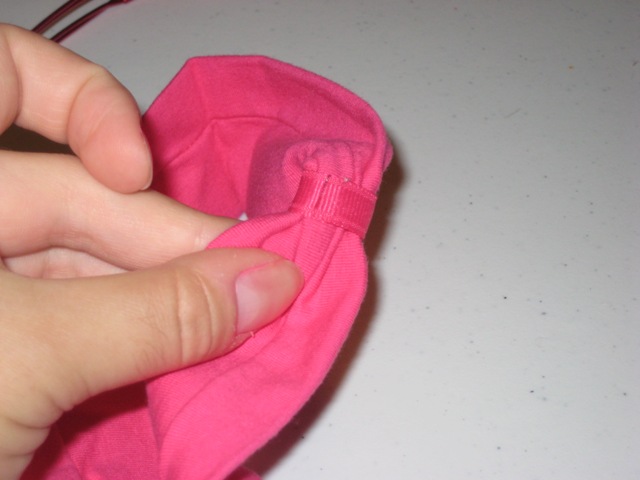
And then place the other end of the ribbon, over the glue.

Turn your headband back to the front, and you're finished!

Slide in a favorite bow, and plunk it on your little sweetie!
So easy and so quick! Warning: it could get addictive to make these.

A quick note: this headband just barely fit Elissa. It's perfect for 9 + month babies. I would recommend either elastic or the crochet headbands for younger babies, since their heads are still so tiny.
*Please feel free to leave me any feedback about this tutorial, if you find it confusing, or if you have any questions. This was my first tutorial, and it's always a learning experience trying something new. And if you make a headband, let me know. I'd love to see a photo of your craftiness! Good luck and have fun!
0 comments:
Post a Comment